Prerequisites
I recommend a dedicated (non-VM) Kali distribution if you don’t have a Raspberry Pi.
Introduction
I have noted to myself, on more than one occasion, now more than eight years in to writing toolsmith, that I have not once covered wireless assessment tools. That constitutes a serious shortcoming on my part, one that I will rectify here with a discussion of
FruityWifi and
WUDS. These tools serve rather different purposes but both conform to the same principle of significant portability as both run on Raspberry Pi. Both also run on Debian systems (Kali) which is how I ran both for toolsmith testing purposes. FruityWifi is an open source platform with which to audit wireless networks, allowing users to conduct various attacks via the web interface or remote messaging. It is modular, feature-rich, and just celebrated a v2.0 release with many upgrades. WUDS, or the Wi-Fi User Detection System, on the other hand, is a proximity-based physical security concept that alerts on unapproved Wi-Fi probe requests bouncing off a WUDS sensor. Per the WUDS introduction, “The combination of a white list of unique identifiers for devices that belong in the area (MAC addresses) and signal strength (RSSI) can be used to create a protected zone. With tuning, this creates a circular detection barrier that, when crossed, can trigger any number of alert systems. WUDS includes an SMS alert module, but the sky is the limit.”
WUDS comes to us courtesy of toolsmith alum Tim Tomes (
@lanmaster53) whose Recon-ng, the 2013 Toolsmith Tool of the Year, we covered in
May 2013.
For FruityWifi highlights I reached out to xtr4nge (
@FruityWifi), the project lead/developer.
The initial idea was to create an open source application to audit wireless networks and perform penetration tests from a Raspberry-Pi, or any other platform or device in a flexible, modular and portable manner.
Soon after the first version was published, FruityWifi was presented to a Rooted Warfare Spain audience (Rooted CON) in March 2014. FruityWifi was well received at the conference and by users from the onset, and many users sent feedback and ideas to improve it.
A new version of FruityWifi (v2.0) was published a few weeks ago featuring many changes and updates; a new interface, new modules, Realtek chipsets support (confirmed in my testing with my Alfa card), Mobile Broadband (3G/4G) support, a new control panel, and more. The tool is under constant development and new modules and improvements are being published regularly.
Tim kindly provided detail regarding his favorite WUDS features and use case. His favorite feature is the alert system, and I strongly second this; I’ll show you why later in the article. Tim built a really simple interface for creating new alerts for the system, which does not require the need to dig into core components of the code to create new alerts. You need only add a function to the alerts.pyfile, name it correctly, and add associated options to the config.py file, and you’re finished. Tim’s script originally included just an SMS alerting mechanism, but he has since added a Pushover notification alert (5 minutes and 8 lines of code to implement); he exclusively uses the Pushover alert.
Tim’s favorite WUDS use case story is cited in his
article, about the deliveryman alerting the system during testing. He’d been doing some testing the night before and in the middle of the afternoon the following day, an SMS message came through to his phone notifying him that someone had crossed his detection barrier. He was about to write it off as a false positive when the doorbell rang and it was a delivery service dropping off a package. The alert served as positive affirmation that the concept is a sound one.
In the future, Tim plans to either expand WUDS, or create another tool all together, that does the exact opposite of WUDS. Rather than alert on foreign MAC addresses, this tool would allow the user to configure the sensor to alert when certain MAC addresses leave the premises during specified windows of time. This would provide a sort of latchkey system that is not challenged by MAC randomization issues; devices will be properly connected to the local WAP with their normal MAC addresses when on premises. That said, the tool would need to be expanded to sense more than just probes.
I ran FruityWifi and WUDS on a dedicated Lenovo T61p laptop with Kali 64-bit installed and utilized the onboard wireless adapter. Both tools are optimized to perform well on Raspberry Pi, but as I don’t have one, I experimented with both Ubuntu and Kali and was far more satisfied with Kali, no muss, no fuss. All installation steps that follow assume you’re running on Kali.
FruityWifi installation
FruityWifi installation is very simple.
Downloadthe master zip file or git clone the repository to your preferred directory, then
cd /FruityWifi from there. Run
./install-FruityWifi.sh. If you have any issues after installation where FruityWifi isn’t available via the browser, it may be related to the Nginx/PHP5-FPM deployment. You can follow the FruityWifi Nginx wiki guidance to correct the issue. Thereafter, browse to http://localhost:8000 or https://localhost:8443, login with admin and admin (change the password), and you’re off to the races as seen in the UI’s configuration page per
Figure 1.
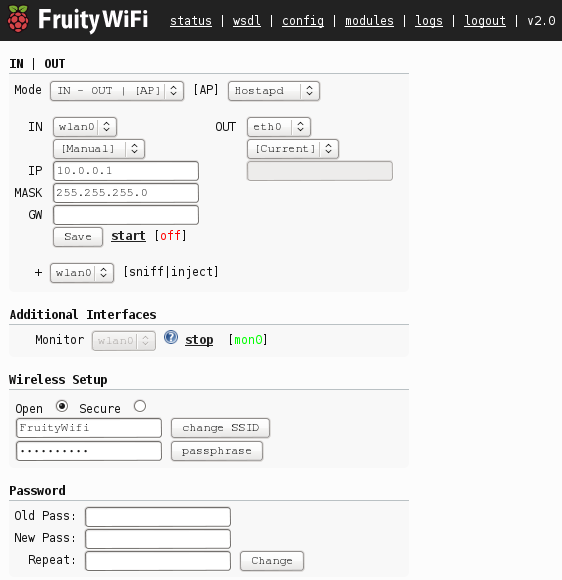 |
| Figure 1 – FruityWifi configuration page |
FruityWifi inside the perimeter
Building on the same principles as the
Pwn Plug, a FruityWifi-enable device can wreak havoc once unleashed inside any given network. There are a significant number of modules you can install and enable, a veritable fruit basket, depending on what you wish to accomplish, as seen in
Figure 2.
 |
| Figure 2 – FruityWifi modules galore |
If you utilized the earlier version of Fruity, you’ll really appreciate the update that is 2.0. Clean, fast, intuitive, and lots of fresh functionality. Red-teamers will enjoy AutoSSH,
which allows reverse SSH connections, and automatic restart for connections that have been closed or dropped. FruityWifi 2.0 includes Nessus, Nmap, and Meterpreter as well. MDK3 is particularly attractive if you’re conducting an aggressive pentest and you want to create a distraction or a disruption.
You had better have permission before going off with MDK3, wireless hacking is deemed criminal in more than one state. MDK, or murder, death, kill for WLAN environments, utilizes a variety of SSID, authentication, and de-authentication flooding techniques to create wireless DoS conditions, and on occasion, WLAN hardware resets. My favorite recent addition to FruityWifi isn’t one of the hacking or enumeration tools, it’s actually vFeed from our friend
@toolswatch. To quote vFeed’s description from the Fruity UI, is a vulnerability database (SQLite) that “provides extra structured detailed third-party references and technical characteristics for a CVE entry through an extensible XML schema.” You can search it right on your FruityWifi instance, after you’ve run Nmap and Nessus scans, identified potentially vulnerable targets and want to look up the related CVE. The available data includes:
- Open security standards: CVE, CWE, CPE, OVAL, CAPEC (all per Mitre), and CVSS
- Vulnerability Assessment & Exploitation IDs: Metasploit, Saint Corporation, Nessus Scripts, Nmap, Exploit-DB, milw0rm
- Vendors Security Alerts: Microsoft, Debian, Redhat, Ubuntu, and others
I looked up CVE-2013-3893, as seen in Figure 3, and was treated to a summary and exploit details. Take note of the vFeed export feature as well. I love vFeed so much I wrote an R parser to turn the XML export into human readable Excel docs for broad reporting and consumption without the machine layer. I’ll be sharing that via the HolisticInfoSec blog and website.
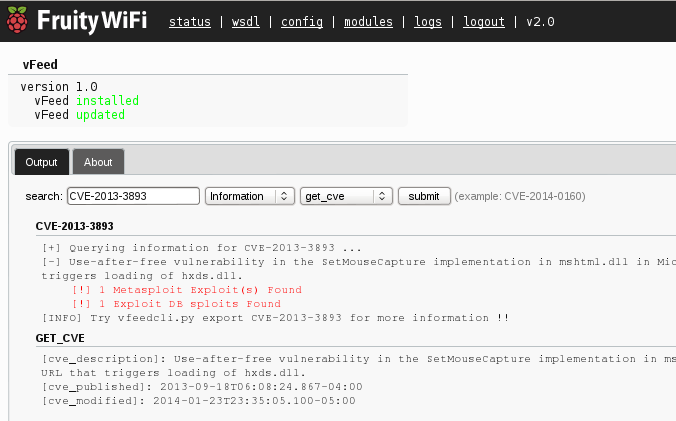 |
| Figure 3 – FruityWifi’s vFeed module informs the analyst |
FruityWifi represents a fabulous way to establish a foothold inside a given perimeter, pivot to additional targets, and conduct complete compromise. Let’s now explore WUDS, intended to help you defend the perimeter. First a little red, then a little blue. Wi-fi not?
WUDS Installation
Tim’s Bitbucket installation guidance is short and sweet:
sudo apt-get install iw python-pcapy sqlite3 screen
# launch a screen session
screen
# install WUDS
git clone https://LaNMaSteR53@bitbucket.org/LaNMaSteR53/wuds.git
cd wuds
# edit the config file
leafpad config.py
# execute the included run script
./run.sh
You really need to get your config.py implementation correct. Default settings work well initially until you get to your ALERT_SMS CONFIG. You’ll need SMTP server access, including the outgoing SMTP server with the TLS port along with username and password, in order to send alert messages. Android and iOS users (there are browser plugins too) can also take advantage of a Pushover account, as Tim mentioned.
Debug is enabled by default, if there are issues, when you run ./run.shyou’ll receive failure notice.
WUDS defends the perimeter
Once WUDS is running there’s not a whole lot to actually see. No sexy UI, just a SQLite database and alerts of your choosing. Figure 4 represents a sqlite browser view of logs.db the WUDS datastore.
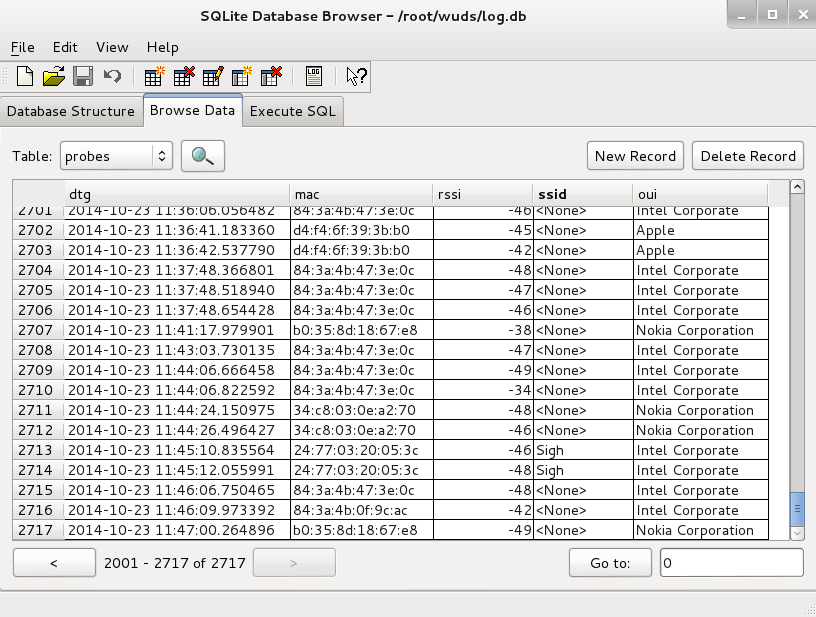 |
| Figure 4 – A view to the WUDS database |
You’ll note that the detected devices all have received signal strength indications (RSSI) of higher than -50. Recall, how much I stressed config.py. The default RSSI threshold for triggering alerts is -50, but you can adjust it depending on how you wish to define your perimeter.
The real pleasure comes from the first alerts received on your mobile device. As you see in a screen shot from my phone (Figure 5), proximity alerts advise me that a variety of devices have been detected on the premises. Ruh-roh!
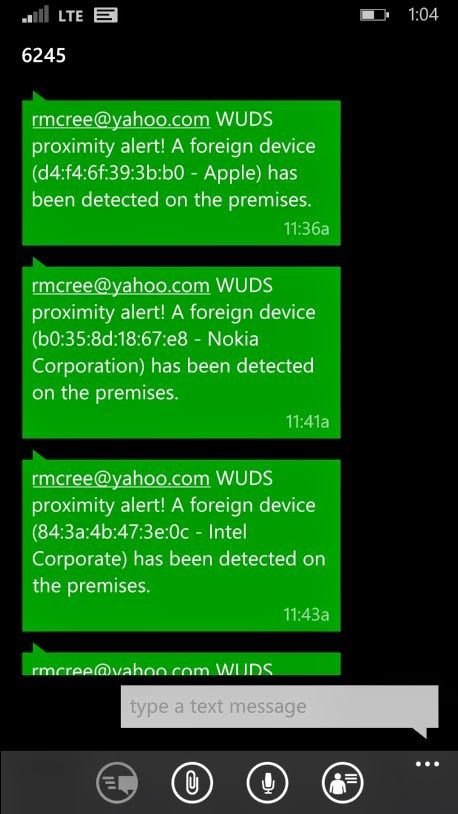 |
| Figure 5 –WUDS alerts of perimeter violations |
True story. When I first enabled WUDS in my office at work, I immediately received alerts for an HP device that was beaconing for my home wireless AP. This freaked me out for a minute as I knew of no HP devices currently in use and certainly not those looking for my house infrastructure. After looking around again, and calming down a bit, a spotted it, an old HP printer under my desk that I’d brought in for scanning, had turned it on years ago, and literally forgotten about it ever since. And there it was, blindly beaconing away for a WAP it would never again communicate with. Thanks WUDS!
You’ll find all sorts of interesting devices chattering away when you enable WUDS. Just remember, the more dense the population area, the noisier it will be. Avoid self-induced mobile device DoS attacks. 🙂
In Conclusion
Great tools from xtr4nge and Tim, I’m thrilled to have gotten off the schnide regarding wireless topics with FruityWifi and WUDS. I’m thinking there’s actually an opportunity to incorporate WUDS in FruityWifi. You heard it here first. Enjoy these tools, they’re both a ton of fun and incredibly useful at the same time.
Ping me via email if you have questions (russ at holisticinfosec dot org).
Cheers…until next month.
Acknowledgements
xtr4nge, FruityWifi project lead and developer
Tim Tomes, WUDS project lead and developer
Continue reading toolsmith: Inside and Outside the Wire with FruityWifi & WUDS→


