Live Response Collection – Bambiraptor

Good news everyone!! After a fairly busy year, the past few weeks I have finally had enough down time to work on adding some long overdue, and hopefully highly anticipated, features to the Live Response Collection. This version, named Bambiraptor, will… Continue reading Live Response Collection – Bambiraptor

Toolsmith Tidbit: Will Ballenthin’s Python-evtx

Andrew Case (@attrc) called out Will Ballenthin’s (@williballenthin) Python-evtx on Twitter, reminding me that I’m long overdue in mentioning it here as well.

Will’s Python-evtx description from his website for same follows:
“python-evtx is a pure Python parser for recent Windows Event Log files (those with the file extension “.evtx”). The module provides programmatic access to the File and Chunk headers, record templates, and event entries. For example, you can use python-evtx to review the event logs of Windows 7 systems from a Mac or Linux workstation. The structure definitions and parsing strategies were heavily inspired by the work of Andreas Schuster and his Perl implementation Parse-Evtx.”

Assuming you’ve running Python 2.7, install it via pip install python-evtx or download source from Github: https://github.com/williballenthin/python-evtx Continue reading Toolsmith Tidbit: Will Ballenthin’s Python-evtx

Public release of "allyourpebblearebelongtous" Perl script

Hello again readers and welcome back! This blog post is going to be fairly short, as the primary purpose is to publicly announce a new script, cleverly titled “allyourpebblearebelongtous.pl”. This Perl script will allow the user to parse out data from … Continue reading Public release of "allyourpebblearebelongtous" Perl script

Toolsmith Feature Highlight: Autopsy 4.0.0’s case collaboration

First, here be changes.
After nearly ten years of writing toolsmith exactly the same way once a month, now for the 117th time, it’s time to mix things up a bit.
1) Tools follow release cycles, and often may add a new feature that could be really interesting, even if the tool has been covered in toolsmith before.
2) Sometimes there may not be a lot to say about a tool if its usage and feature set are simple and easy, yet useful to us.
3) I no longer have an editor or publisher that I’m beholden too, there’s no reason to only land toolsmith content once a month at the same time.
Call it agile toolsmith. If there’s a good reason for a short post, I’ll do so immediately, such as a new release of feature, and every so often, when warranted, I’ll do a full coverage analysis of a really strong offering.
For tracking purposes, I’ll use title tags (I’ll use these on Twitter as well):

  • Toolsmith Feature Highlight
    • new feature reviews
  • Toolsmith Release Advisory
    • heads up on new releases
  • Toolsmith Tidbit
    • infosec tooling news flashes
  • Toolsmith In-depth Analysis
    • the full monty

That way you get the tl;dr so you know what you’re in for.

On to our topic.
This is definitely in the “in case you missed it” category, I was clearly asleep at the wheel, but Autopsy 4.0.0 was released Nov 2015. The major highlight of this release is specifically the ability to setup a multi-user environment, including “multi-user cases supported that allow collaboration using network-based services.” Just in case you aren’t current on free and opensource DFIR tools, “Autopsy® is a digital forensics platform and graphical interface to The Sleuth Kit® and other digital forensics tools.” Thanks to my crew, Luiz Mello for pointing the v4 release out to me, and to Mike Fanning for a perfect small pwned system to test v4 with.

Autopsy 4.0.0 case creation walk-through

I tested the latest Autopsy with an .e01 image I’d created from a 2TB victim drive, as well as against a mounted VHD.

Select the new case option via the opening welcome splash (green plus), the menu bar via File | New Case, or Ctrl+N:

New case

Populate your case number and examiner:

Case number and examiner

Point Autopsy at a data source. In this case I refer to my .e01 file, but also mounted a VHD as a local drive during testing (an option under select source type drop-down.

Add data source

Determine which ingest modules you’d like to use. As I examined both a large ext4 filesystem as well as a Windows Server VHD, I turned off Android Analyzer…duh. 🙂

Ingest modules

After the image or drive goes through initial processing you’ll land on the Autopsy menu. The Quick Start Guide will get you off to the races.

The real point of our discussion here is the new Autopsy 4.0.0 case collaboration feature, as pulled directly from Autopsy User Documentation: Setting Up Multi-user Environment

Multi-user Installation

Autopsy can be setup to work in an environment where multiple users on different computers can have the same case open at the same time. To set up this type of environment, you will need to configure additional (free and open source) network-based services.

Network-based Services

You will need the following that all Autopsy clients can access:

  • Centralized storage that all clients running Autopsy have access to. The central storage should be either mounted at the same Windows drive letter or UNC paths should be used everywhere. All clients need to be able to access data using the same path.
  • A central PostgreSQL database. A database will be created for each case and will be stored on the local drive of the database server. Installation and configuration is explained in Install and Configure PostgreSQL.
  • A central Solr text index. A Solr core will be created for each case and will be stored in the case folder (not on the local drive of the Solr server). We recommend using Bitnami Solr. This is explained in Install and Configure Solr.
  • An ActiveMQ messaging server to allow the various clients to communicate with each other. This service has minimal storage requirements. This is explained in Install and Configure ActiveMQ.

When you setup the above services, securely document the addresses, user names, and passwords so that you can configure each of the client systems afterwards.

The Autopsy team recommends using at least two dedicated computers for this additional infrastructure. Spreading the services out across several machines can improve throughput. If possible, place Solr on a machine by itself, as it utilizes the most RAM and CPU among the servers.

Ensure that the central storage and PostgreSQL servers are regularly backed up.

Autopsy Clients

Once the infrastructure is in place, you will need to configure Autopsy to use them.

Install Autopsy on each client system as normal using the steps from Installing Autopsy.
Start Autopsy and open the multi-user settings panel from “Tools”, “Options”, “Multi-user”. As shown in the screenshot below, you can then enter all of the address and authentication information for the network-based services. Note that in order to create or open Multi-user cases, “Enable Multi-user cases” must be checked and the settings below must be correct.

Multi-user settings

In closing

Autopsy use is very straightforward and well documented. As of version 4.0.0, the ability to utilize a multi-user is a highly beneficial feature for larger DFIR teams. Forensicators and responders alike should be able to put it to good use.
Ping me via email or Twitter if you have questions (russ at holisticinfosec dot org or @holisticinfosec).
Cheers…until next month time.

Continue reading Toolsmith Feature Highlight: Autopsy 4.0.0’s case collaboration

toolsmith #115: Volatility Acuity with VolUtility

Yes, we’ve definitely spent our share of toolsmith time on memory analysis tools such as Volatility and Rekall, but for good reason. I contend that memory analysis is fundamentally one of the most important skills you’ll develop and utilize throughout your DFIR career.
By now you should have read The Art of Memory Forensics, if you haven’t, it’s money well spent, consider it an investment.
If there is one complaint, albeit a minor one, that analysts might raise specific to memory forensics tools, it’s that they’re very command-line oriented. While I appreciate this for speed and scripting, there are those among us who prefer a GUI. Who are we to judge? 🙂
Kevin Breen’s (@kevthehermit) VolUtility is a full function web UI for Volatility which fills the gap that’s been on user wishlists for some time now.
When I reached out to Kevin regarding the current state of the project, he offered up a few good tidbits for user awareness.

1. Pull often. The project is still in its early stages and its early life is going to see a lot of tweaks, fixes, and enhancements as he finishes each of them.
2. If there is something that doesn’t work, could be better, or removed, open an issue. Kevin works best when people tell him what they want to see.
3. He’s working with SANS to see VolUtility included in the SIFT distribution, and release a Debian package to make it easier to install. Vagrant and Docker instances are coming soon as well. 

The next two major VolUtility additions are:
1. Pre-Select plugins to run on image import.
2. Image Threat Score.

Notifications recently moved from notification bars to the toolbar, and there is now a right click context menu on the plugin output, which adds new features.

Installation

VolUtility installation is well documented on its GitHub site, but for the TLDR readers amongst you, here’s the abbreviated version, step by step. This installation guidance assumes Ubuntu 14.04 LTS where Volatility has not yet been installed, nor have tools such as Git or Pip.
Follow this command set verbatim and you should be up and running in no time:

  1. sudo apt-get install git python-dev python-pip
  2. git clone https://github.com/volatilityfoundation/volatility
  3. cd volatility/
  4. sudo python setup.py install
  5. sudo apt-key adv –keyserver hkp://keyserver.ubuntu.com:80 –recv 7F0CEB10
  6. echo “deb http://repo.mongodb.org/apt/ubuntu trusty/mongodb-org/3.0 multiverse” | sudo tee /etc/apt/sources.list.d/mongodb-org-3.0.list
  7. sudo apt-get update
  8. sudo apt-get install -y mongodb-org
  9. sudo pip install pymongo pycrypto django virustotal-api distorm3
  10. git clone https://github.com/kevthehermit/VolUtility
  11. cd VolUtility/
  12. ./manage.py runserver 0.0.0.0:8000

Point your browser to http://localhost:8000 and there you have it.

VolUtility and an Old Friend

I pulled out an old memory image (hiomalvm02.raw) from September 2011’s toolsmith specific to Volatility where we first really explored Volatility, it was version 2.0 back then. 🙂 This memory image will give us the ability to do a quick comparison of our results from 2011 against a fresh run with VolUtility and Volatility 2.5.

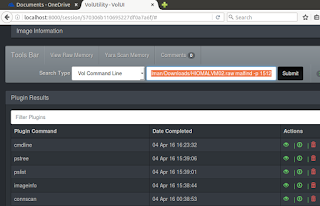
VolUtility will ask you for the path to Volatility plugins and the path to the memory image you’d like to analyze. I introduced my plugins path as /home/malman/Downloads/volatility/volatility/plugins.

The image I’d stashed in Downloads as well, the full path being /home/malman/Downloads/HIOMALVM02.raw.

Upon clicking Submit, cats began loading stuffs. If you enjoy this as much as I do, the Help menu allows you to watch the loading page as often as you’d like.

If you notice any issues such as the image load hanging, check your console, it will have captured any errors encountered.
On my first run, I had not yet installed distorm3, the console view allowed me to troubleshoot the issue quickly.

Now down to business. In our 2011 post using this image, I ran imageinfo, connscan, pslist, pstree, and malfind. I also ran cmdline for good measure via VolUtility. Running plugins in VolUtility is as easy as clicking the associated green arrow for each plugin. The results will accumulate on the toolbar and the top of the plugin selection pane, while the raw output for each plugin will appears beneath the plugin selection pane when you select View Output under Actions.

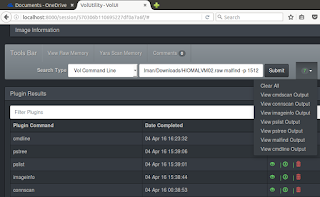
Results were indeed consistent with those from 2011 but enhanced by a few features. Imageinfo yielded WinXPSP3x86 as expected, connscan returned 188.40.138.148:80 as our evil IP and the associated suspect process ID of 1512. Pslist and pstree then confirmed parent processes and the evil emanated from an ill-conceived click via explorer.exe. If you’d like to export your results, it’s as easy as selecting Export Output from the Action menu. I did so for pstree, as it is that plugin from whom all blessings flow, the results were written to pstree.csv.

We’re reminded that explorer.exe (PID 1512) is the parent for cleansweep.exe (PID 3328) and that cleansweep.exe owns no threads current threads but is likely the original source of pwn. We’re thus reminded to explore (hah!) PID 1512 for information. VolUtility allows you to run commands directly from the Tools Bar, I did so with vol.py -f /home/malman/Downloads/HIOMALVM02.raw malfind -p 1512.

Rather than regurgitate malfind results as noted from 2011 (you can review those for yourself), I instead used the VolUtility Tools Bar feature Yara Scan Memory. Be sure to follow Kevin’s Yara installation guidance if you want to use this feature. Also remember to git pull! Kevin updated the Yara capabilities between the time I started this post and when I ran yarascan. Like he said, pull often. There is a yararules folder now in the VolUtility file hierarchy, I added spyeye.yar, as created from Jean-Philippe Teissier’s rule set. Remember, from the September 2011 post, we know that hiomalvm02.raw taken from a system infected with SpyEye. I then selected Yara Scan Memory from the Tools Bar, and pointed to the just added spyeye.yar file.

The results were immediate, and many, as expected.

You can also use String Search / yara rule from the Tools Bar Search Type field to accomplish similar goals, and you can get very granular with you string searches to narrow down results.
Remember that your sessions will persist thanks to VolUtility’s use of MongoDB, so if you pull, then restart VolUtility, you’ll be quickly right back where you left off.

In Closing

VolUtility is a great effort, getting better all the time, and I find its convenience irresistible. Kevin’s doing fine work here, pull down the project, use it, and offer feedback or contributions. It’s a no-brainer for VolUtility to belong in SIFT by default, but as you’ve seen, building it for yourself is straightforward and quick. Add it to your DFIR utility belt today.
As always, ping me via email or Twitter if you have questions: russ at holisticinfosec dot org or @holisticinfosec.

ACK

Thanks to Kevin (@kevthehermit) Breen for VolUtility and his feedback for this post. Continue reading toolsmith #115: Volatility Acuity with VolUtility