First, here be changes.
After nearly ten years of writing toolsmith exactly the same way once a month, now for the 117th time, it’s time to mix things up a bit.
1) Tools follow release cycles, and often may add a new feature that could be really interesting, even if the tool has been covered in toolsmith before.
2) Sometimes there may not be a lot to say about a tool if its usage and feature set are simple and easy, yet useful to us.
3) I no longer have an editor or publisher that I’m beholden too, there’s no reason to only land toolsmith content once a month at the same time.
Call it agile toolsmith. If there’s a good reason for a short post, I’ll do so immediately, such as a new release of feature, and every so often, when warranted, I’ll do a full coverage analysis of a really strong offering.
For tracking purposes, I’ll use title tags (I’ll use these on Twitter as well):
- Toolsmith Feature Highlight
- Toolsmith Release Advisory
- Toolsmith Tidbit
- infosec tooling news flashes
- Toolsmith In-depth Analysis
That way you get the tl;dr so you know what you’re in for.
On to our topic.
This is definitely in the “in case you missed it” category, I was clearly asleep at the wheel, but Autopsy 4.0.0 was released Nov 2015. The major highlight of this release is specifically the ability to setup a multi-user environment, including “multi-user cases supported that allow collaboration using network-based services.” Just in case you aren’t current on free and opensource DFIR tools, “Autopsy® is a digital forensics platform and graphical interface to The Sleuth Kit® and other digital forensics tools.” Thanks to my crew, Luiz Mello for pointing the v4 release out to me, and to Mike Fanning for a perfect small pwned system to test v4 with.
Autopsy 4.0.0 case creation walk-through
I tested the latest Autopsy with an .e01 image I’d created from a 2TB victim drive, as well as against a mounted VHD.
Select the new case option via the opening welcome splash (green plus), the menu bar via File | New Case, or Ctrl+N:
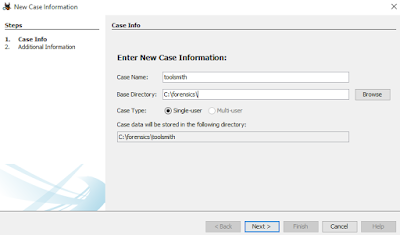 |
| New case |
Populate your case number and examiner:
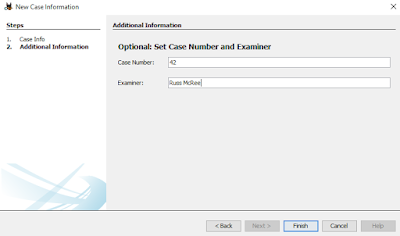 |
| Case number and examiner |
Point Autopsy at a data source. In this case I refer to my .e01 file, but also mounted a VHD as a local drive during testing (an option under select source type drop-down.
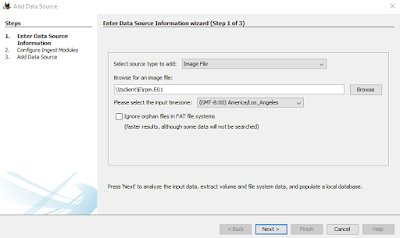 |
| Add data source |
Determine which ingest modules you’d like to use. As I examined both a large ext4 filesystem as well as a Windows Server VHD, I turned off Android Analyzer…duh. 🙂
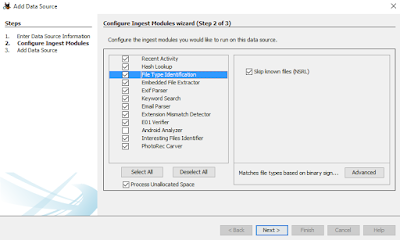 |
| Ingest modules |
After the image or drive goes through initial processing you’ll land on the Autopsy menu. The Quick Start Guide will get you off to the races.
The real point of our discussion here is the new Autopsy 4.0.0 case collaboration feature, as pulled directly from Autopsy User Documentation: Setting Up Multi-user Environment
Multi-user Installation
Autopsy can be setup to work in an environment where multiple users on different computers can have the same case open at the same time. To set up this type of environment, you will need to configure additional (free and open source) network-based services.
Network-based Services
You will need the following that all Autopsy clients can access:
- Centralized storage that all clients running Autopsy have access to. The central storage should be either mounted at the same Windows drive letter or UNC paths should be used everywhere. All clients need to be able to access data using the same path.
- A central PostgreSQL database. A database will be created for each case and will be stored on the local drive of the database server. Installation and configuration is explained in Install and Configure PostgreSQL.
- A central Solr text index. A Solr core will be created for each case and will be stored in the case folder (not on the local drive of the Solr server). We recommend using Bitnami Solr. This is explained in Install and Configure Solr.
- An ActiveMQ messaging server to allow the various clients to communicate with each other. This service has minimal storage requirements. This is explained in Install and Configure ActiveMQ.
When you setup the above services, securely document the addresses, user names, and passwords so that you can configure each of the client systems afterwards.
The Autopsy team recommends using at least two dedicated computers for this additional infrastructure. Spreading the services out across several machines can improve throughput. If possible, place Solr on a machine by itself, as it utilizes the most RAM and CPU among the servers.
Ensure that the central storage and PostgreSQL servers are regularly backed up.
Autopsy Clients
Once the infrastructure is in place, you will need to configure Autopsy to use them.
Install Autopsy on each client system as normal using the steps from Installing Autopsy.
Start Autopsy and open the multi-user settings panel from “Tools”, “Options”, “Multi-user”. As shown in the screenshot below, you can then enter all of the address and authentication information for the network-based services. Note that in order to create or open Multi-user cases, “Enable Multi-user cases” must be checked and the settings below must be correct.
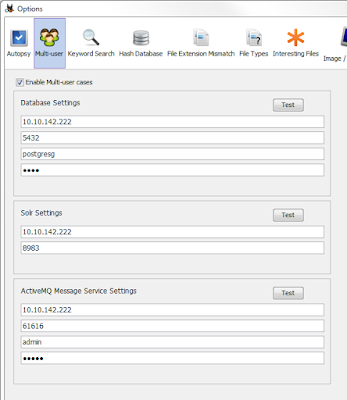 |
| Multi-user settings |
In closing
Autopsy use is very straightforward and well documented. As of version 4.0.0, the ability to utilize a multi-user is a highly beneficial feature for larger DFIR teams. Forensicators and responders alike should be able to put it to good use.
Ping me via email or Twitter if you have questions (russ at holisticinfosec dot org or @holisticinfosec).
Cheers…until next month time.
Continue reading Toolsmith Feature Highlight: Autopsy 4.0.0’s case collaboration→