Block Building Checklist

It is important to understand how artifacts are created that you use during an investigation. Thus I wanted to provide my block building checklist to help others recreate the process. I will walk through the commands used to prepare the blocks for distribution and how to build the block libraries with the removal of a whitelist.

Block Preparation

I have used Windows, Linux and Mac OS X over the course of this project. I recommend using the operating system that your most comfortable with for downloading and unpacking the VirusShare.com torrents. The best performance will come from using solid state drives during the block building steps. The more available memory during whitelisting the better. A lot less system resources are necessary when just doing hash searches and comparisons during block hunting.

We saw this command previously in the Block Huntingpost with a new option. The -x option disables parsers so that bulk_extractor only generates the block sector hashes reducing the necessary generation time.

bulk_extractor -x accts -x aes -x base64 -x elf -x email -x exif -x find -x gps -x gzip -x hiberfile -x httplogs -x json -x kml -x msxml -x net -x pdf -x rar -x sqlite -x vcard -x windirs -x winlnk -x winpe -x winprefetch -x zip -e hashdb -o VxShare199_Out -S hashdb_mode=import -S hashdb_import_repository_name=VxShare199 -S hashdb_block_size=512 -S hashdb_import_sector_size=512 -R VirusShare_00199

The following steps help with the reduction of disk storage requirements and reporting cleanliness for the sector block hash database.  It is also a similar process for migrating from hashdb version one to two.  One improvement that I need to make is to use JSON instead of DFXML that was released at OSDFCon2015 by Bruce Allen.  

We need to export the sector block hashes out of the database so that the suggested modifications can be made to the flat file output.   

hashdb export VxShare199_Out/hashdb.hdb VxShare199.out

·      hashdb – executed application

·      export – export sector block hashes as a dfxml file

·      VxShare185_Out/ – relative folder path to the hashdb

·      hashdb.hdb – default hashdb name created by bulk_extractor

·      VxShare199.out – flat file output in dfxml format

Copy the first two lines of the VxShare199.out file into a new VxShare199.tmp flat file.

head -n 2 VxShare199.out > VxShare199.tmp


Start copying the contents of VxShare199.out file at line twenty-two that are appended to the existing VxShare199.tmp file. The below image indicates what lines will be removed by this command. The line count may vary depending on the operating system or the version of bulk_extractor and hashdb installed.

tail -n +22 VxShare199.out >> VxShare199.tmp


The sed command will read the VxShare199.tmp file than remove the path and beginning of the file name prior to writing into the new VxShare199.dfxml file. The highlighted text in the image below indicates what will be removed. 

sed ‘s/VirusShare_00199\/VirusShare\_//g’ VxShare199.tmp > VxShare199.dfxml

Create an empty hashdb with the sector size of 512 using the -p option. The default size is 4096 if no option is provided.

hashdb create -p 512 VxShare199

Import the processed VxShare199.dfxml file into the newly created VxShare199 hashdb database.

hashdb import VxShare199 VxShare199.dfxml

I compress and upload the hashdb database for distribution saving these steps for everyone.

Building Block Libraries

The links to these previously generated hashdb databases can be found at the following link.

Create an empty hashdb called FileBlock.VxShare for the VirusShare.com collection.

hashdb create -p 512 FileBlock.VxShare

Add the VxShare199 database to the FileBlock.VxShare database.  This step will need to be repeated for each database. Upkeep is easier when you keep the completely built FileBlock.VxShare database for ongoing additions of new sector hashes.

hashdb add VxShare199 FileBlock.VxShare

Download the sector hashes of the NSRL from the following link. 

Create an empty hashdb called FileBlock.NSRL for the NSRL collection.

hashdb create -p 512 FileBlock.NSRL                 

The NSRL block hashes are stored in a tab delimited flat file format.  The import_tab option is used to import each file that are split by the first character of the hash value, 0-9 and A-F.  I also keep a copy of the built FileBlock.NSRL for future updates too.

hashdb import_tab FileBlock.NSRL MD5B512_0.tab

Remove NSRL Blocks

Create an empty hashdb called FileBlock.Info for the removal of the whitelist.

hashdb create -p 512 FileBlock.Info

This command will remove the NSRL sector hashes from the VirusShare.com collection creating the final FileBlock.Info database for block hunting.

hashdb subtract FileBlock.VxShare FileBlock.NSRL FileBlock.Info

The initial build is machine time intensive but once done the maintenance is a walk in the park.

Happy Block Hunting!!

John Lukach

@FileBlocks

Continue reading Block Building Checklist

Block Hunting

In DFIR practices, we use hash algorithms to identify and validate data of all types. The typical use is applying them against an entire file, and we get a value back that represents that file as a whole. We can then use those hash values to search for Indicators of Compromise (IOC) or even eliminate files that are known to be safe as indicated by collections such as National Software Reference Library (NSRL). In this post, however, I am going to apply these hashes in a different manner.

The complete file will be broken down into smaller chunks and hashed for identification.  You will primarily have two types of blocks, a cluster and a sector. A cluster block will be tied to the operating system where sector blocks corresponds to the physical disk. For example Microsoft Windows by default has a cluster size of 4,096 that is made up of eight 512 sectors that is common across many operating systems. Sectors are the smallest area on the disk that can be used providing the most accuracy for block hunting.

Here are the block hunting techniques I will demonstrate:

  1. locate sectors holding identifiable data
  2. determine if a file has previously existed

I will walk you through the command line process, and then provide links to a super nice GUI. As an extra bonus, I will tell you about some pre-built sector block databases. 

Empty Image or Not

If you haven’t already, at some point you will receive an image that appears to be nothing but zeroes. Who wants to scroll through terabytes of unallocated space looking for data? A quick way to triage the image is to use bulk_extractor to identify known artifacts such as internet history, network packets, carved files, keywords and much more. What happens if the artifacts are fragmented or unrecognizable?

This is where sector hashing with bulk_extractor in conjunction with hashdb comes in handy to quickly find identifiable data. A lot of great features are being added on a regular basis, so make sure you are always using the most current versions found at: http://digitalcorpora.org/downloads/hashdb/experimental/

Starting Command

The following command will be used for both block hunting techniques.

bulk_extractor -e hashdb -o Out -S hashdb_mode=import -S hashdb_import_repository_name=Unknown -S hashdb_block_size=512 -S hashdb_import_sector_size=512 USB.dd

  • bulk_extractor – executed application 
  • -e hashdb – enables usage of the hashdb application 
  • -o Out – user defined output folder created by bulk_extractor 
  • -S hashdb_mode=import – generates the hashdb database 
  • -S hashdb_import_repository=Unknown – user defined hashdb repository name 
  • -S hashdb_block_size=512 – size of block data to read 
  • -S hahsdb_import_sector_size=512 – size of block hash to import 
  • USB.dd – disk image to process 

Inside the Out folder that was declared by the -o option, you will find a hashdb.hdb database folder that is generated. Running the next command will extract the collected hashes into dfxml format for review.

hashdb export hashdb.hdb out.dfxml

Identifying Non-Zero Sectors

The dfxml output will provide the offset in the image where a non-low entropy sector block was identified. This is important to help limit to false positives where a low value block could appear across multiple good and evil files. Entropy is the measurement of randomness. An example of an low entropy block would be one containing all 0x00 or 0xFF data for the entire sector.

Here is what the dfxml file will contain for an identified block.

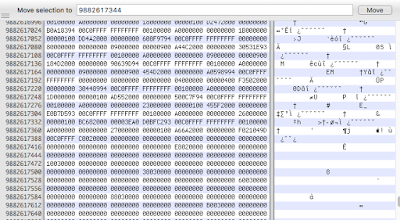
Use your favorite hex editor or forensic software to review the contents of the identified sectors for recognizable characteristics. Now we have identified that the drive image isn’t empty that didn’t require a large amount of manual effort. Just don’t tell my boss, and I won’t tell yours!
Deleted & Fragmented File Recovery

Occasionally, I receive a request to determine if a file has ever existed on a drive. This file could be intellectual property, customer list or a malicious executable. If the file is allocated, this can be done in short order. If the file doesn’t exist in the file system, it will be nearly impossible to find without a specialized technique. In order for this process to work, you must have a copy of the file that can be used to generate the sector hashdb database.

This command will generate a hashdb.hdb database of the BadFile.zip designated for recovery.

bulk_extractor -e hashdb -o BadFileOut -S hashdb_mode=import -S hashdb_import_repository_name=BadFile -S hashdb_block_size=512 -S hashdb_import_sector_size=512 BadFile.zip

The data will be used for scrubbing our drive of interest to run the comparisons. I am targeting a single file, but the command above can be applied to multiple files inside subfolders by using the -R option against a specific folder.

The technique will be able to identify blocks of a deleted file, as long as they haven’t been overwritten. It doesn’t even matter how fragmented the file was when it was allocated. In order to use the previously generated hashdb database to identify the file (or files) that we put into it, we need to switch the hashdb_mode from import to scan.

bulk_extractor -e hashdb -S hashdb_mode=scan -S hashdb_scan_path_or_socket=hashdb.hdb -S hashdb_block_size=512 -o USBOut USB.dd

Inside the USBOut output folder, there is a text file called identified_blocks.txt that records the matching hashes and image offset location. If the generated hashdb database contained multiple files, the count variable will tell you how many files contained a matching hash for each sector block hash.
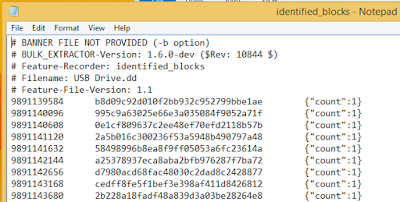
Additional information can be obtained by using the expand_identified_blocks command option.

hashdb expand_identified_blocks hashdb.hdb identified_blocks.txt

Super Nice GUI

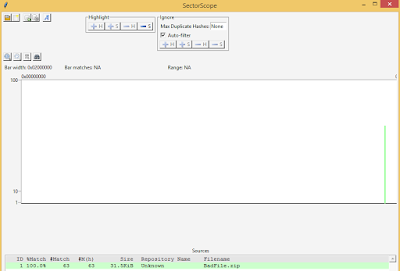
SectorScope is a Python 3 GUI interface for this same command line process that was presented at OSDFCon 2015 by Michael McCarrin and Bruce Allen. You definitely want to check it out: https://github.com/NPS-DEEP/NPS-SectorScope
Pre-Built Sector Block Databases

The last bit of this post are some goodies that would take you a long time to build on your own. I know, because I built one of these sets for you. The other set is provided by the same great folks at NIST that give us the NSRL hash databases. They went the extra step to provide us with a block hash list of every file contained in the NSRL that we have been using for years.

Subtracting the NSRL sector hashes from your hashdb will remove known blocks.

http://www.nsrl.nist.gov/ftp/MD5B512/

VirusShare.com collections is also available for evil sector block hunting too.

https://github.com/jblukach/FileBlock.Info#aquire-copy

Happy Block Hunting!!
John Lukach
@FileBlocks

Continue reading Block Hunting

Block Hunting

In DFIR practices, we use hash algorithms to identify and validate data of all types. The typical use is applying them against an entire file, and we get a value back that represents that file as a whole. We can then use those hash values to search for Indicators of Compromise (IOC) or even eliminate files that are known to be safe as indicated by collections such as National Software Reference Library (NSRL). In this post, however, I am going to apply these hashes in a different manner.

The complete file will be broken down into smaller chunks and hashed for identification.  You will primarily have two types of blocks, a cluster and a sector. A cluster block will be tied to the operating system where sector blocks corresponds to the physical disk. For example Microsoft Windows by default has a cluster size of 4,096 that is made up of eight 512 sectors that is common across many operating systems. Sectors are the smallest area on the disk that can be used providing the most accuracy for block hunting.

Here are the block hunting techniques I will demonstrate:

  1. locate sectors holding identifiable data
  2. determine if a file has previously existed

I will walk you through the command line process, and then provide links to a super nice GUI. As an extra bonus, I will tell you about some pre-built sector block databases. 

Empty Image or Not

If you haven’t already, at some point you will receive an image that appears to be nothing but zeroes. Who wants to scroll through terabytes of unallocated space looking for data? A quick way to triage the image is to use bulk_extractor to identify known artifacts such as internet history, network packets, carved files, keywords and much more. What happens if the artifacts are fragmented or unrecognizable?

This is where sector hashing with bulk_extractor in conjunction with hashdb comes in handy to quickly find identifiable data. A lot of great features are being added on a regular basis, so make sure you are always using the most current versions found at: http://digitalcorpora.org/downloads/hashdb/experimental/

Starting Command

The following command will be used for both block hunting techniques.

bulk_extractor -e hashdb -o Out -S hashdb_mode=import -S hashdb_import_repository_name=Unknown -S hashdb_block_size=512 -S hashdb_import_sector_size=512 USB.dd

  • bulk_extractor – executed application 
  • -e hashdb – enables usage of the hashdb application 
  • -o Out – user defined output folder created by bulk_extractor 
  • -S hashdb_mode=import – generates the hashdb database 
  • -S hashdb_import_repository=Unknown – user defined hashdb repository name 
  • -S hashdb_block_size=512 – size of block data to read 
  • -S hahsdb_import_sector_size=512 – size of block hash to import 
  • USB.dd – disk image to process 

Inside the Out folder that was declared by the -o option, you will find a hashdb.hdb database folder that is generated. Running the next command will extract the collected hashes into dfxml format for review.

hashdb export hashdb.hdb out.dfxml

Identifying Non-Zero Sectors

The dfxml output will provide the offset in the image where a non-low entropy sector block was identified. This is important to help limit to false positives where a low value block could appear across multiple good and evil files. Entropy is the measurement of randomness. An example of an low entropy block would be one containing all 0x00 or 0xFF data for the entire sector.

Here is what the dfxml file will contain for an identified block.

Use your favorite hex editor or forensic software to review the contents of the identified sectors for recognizable characteristics. Now we have identified that the drive image isn’t empty that didn’t require a large amount of manual effort. Just don’t tell my boss, and I won’t tell yours!

Deleted & Fragmented File Recovery

Occasionally, I receive a request to determine if a file has ever existed on a drive. This file could be intellectual property, customer list or a malicious executable. If the file is allocated, this can be done in short order. If the file doesn’t exist in the file system, it will be nearly impossible to find without a specialized technique. In order for this process to work, you must have a copy of the file that can be used to generate the sector hashdb database.

This command will generate a hashdb.hdb database of the BadFile.zip designated for recovery.

bulk_extractor -e hashdb -o BadFileOut -S hashdb_mode=import -S hashdb_import_repository_name=BadFile -S hashdb_block_size=512 -S hashdb_import_sector_size=512 BadFile.zip

The data will be used for scrubbing our drive of interest to run the comparisons. I am targeting a single file, but the command above can be applied to multiple files inside subfolders by using the -R option against a specific folder.

The technique will be able to identify blocks of a deleted file, as long as they haven’t been overwritten. It doesn’t even matter how fragmented the file was when it was allocated. In order to use the previously generated hashdb database to identify the file (or files) that we put into it, we need to switch the hashdb_mode from import to scan.

bulk_extractor -e hashdb -S hashdb_mode=scan -S hashdb_scan_path_or_socket=hashdb.hdb -S hashdb_block_size=512 -o USBOut USB.dd

Inside the USBOut output folder, there is a text file called identified_blocks.txt that records the matching hashes and image offset location. If the generated hashdb database contained multiple files, the count variable will tell you how many files contained a matching hash for each sector block hash.

Additional information can be obtained by using the expand_identified_blocks command option.

hashdb expand_identified_blocks hashdb.hdb identified_blocks.txt

Super Nice GUI

SectorScope is a Python 3 GUI interface for this same command line process that was presented at OSDFCon 2015 by Michael McCarrin and Bruce Allen. You definitely want to check it out: https://github.com/NPS-DEEP/NPS-SectorScope

Pre-Built Sector Block Databases

The last bit of this post are some goodies that would take you a long time to build on your own. I know, because I built one of these sets for you. The other set is provided by the same great folks at NIST that give us the NSRL hash databases. They went the extra step to provide us with a block hash list of every file contained in the NSRL that we have been using for years.

Subtracting the NSRL sector hashes from your hashdb will remove known blocks.

http://www.nsrl.nist.gov/ftp/MD5B512/

VirusShare.com collections is also available for evil sector block hunting too.

https://github.com/jblukach/FileBlock.Info#aquire-copy

Happy Block Hunting!!
John Lukach
@FileBlocks

Continue reading Block Hunting