Monkey Plays (LAN) Turtle

OMG! Sooo Turtle-y!

The Hak5 LAN Turtle recently plodded across our desk so we decided to poke it with a stick and see how effective it is in capturing Windows (7) credentials.
From the LAN Turtle wiki:

The LAN Turtle is a covert Systems Administration and Penetration Testing tool providing stealth remote access, network intelligence gathering, and man-in-the-middle monitoring capabilities.
Housed within a generic “USB Ethernet Adapter” case, the LAN Turtle’s covert appearance allows it to blend into many IT environments.

It costs about U$50 and looks like this:

It consists of a System-On-Chip running an openwrt (Linux) based OS. Amongst other things, it can act like a network bridge/router between:
– a USB Ethernet interface which you plug into your target PC. This interface can also be ssh’d into via its static IP address 172.16.84.1 (for initial configuration and copying off creds).
– a 10/100 Mbps Ethernet port which you can use to connect the Turtle to the Internet (providing remote shell access and allowing the install of modules/updates from LANTurtle.com). It is not required to capture creds during normal operation.

It also has 16 MB on board Flash memory and can be configured to run a bunch of different modules via a Module Manager.

By using the Turtle’s USB Ethernet interface to create a new network connection and then sending the appropriate responses, the Turtle is able to capture a logged in user’s Windows credentials. Apparently Windows will send credentials over a network whether the screen is locked or not (a user must be logged in).

We will be using the QuickCreds module written by Darren Kitchen which was based on the research of Rob “Mubix” Fuller.
To send the appropriate network responses, QuickCreds calls Laurent Gaffie’s Responder Python script and saves credentials (eg NTLMv2 for our Win 7 test case) to numbered directories in /root/loot. The amber Ethernet LED will blink rapidly while QuickCreds is running. When finished capturing (~30 secs to a few minutes), the amber LED is supposed to remain lit.

But wait – there’s more! The turtle can also offer remote shell/netcat/meterpreter access, DNS spoofing, man-in-the-middle browser attacks, nmap scans and so much more via various downloadable modules. Alas, we only have enough time/sanity/Turtle food to look at the QuickCreds module.

Setup

We will be both configuring and testing the Turtle on a single laptop running Windows 7 Pro x64 with SP1. Realistically, you would configure it on one PC and then plug it into a separate target PC.
 
We begin setup by plugging the Turtle into the configuration PC and using PuTTY to ssh as root to 172.16.84.1. For proper menu display, be sure to adjust the PuTTY Configuration’s Windows, Translation, Remote character set to “Latin-1, Western Eur“.

The default root Turtle password is sh3llz. Upon first login, the user is then prompted to change the root password.
Ensure an Internet providing Ethernet cable is plugged in to the Turtle’s Ethernet port to provide access to LANTurtle.com updates.

Note: The Turtle may also require Windows to install the “Realtek USB FE Family Controller” Network Adapter driver before you can communicate with it.

Upon entering/confirming the new root password, you should see something like:

LAN Turtle Main Menu via PuTTY session

Under Modules, Module Manager, go to Configure, then Directory to select the QuickCreds module for download. You can select/check a module for download via the arrow/spacebar keys.

Return back to Modules, select the QuickCreds module, then Configure (this will take a few minutes to download/install/configure the dependencies from the Internet). Remember to have an Internet providing Ethernet cable plugged into the Turtle.

Select the QuickCreds Enable option so QuickCreds is launched whenever the Turtle is plugged into a USB port.
(Optional) You can also select the Start option to start the QuickCreds module now and it should collect your current Windows login creds.

We are now ready to remove the Turtle from our config PC and place it into a target PC’s USB port.

If you’re having issues getting the Turtle working, try to manually reset the Turtle following the “Manually Upgrading” wiki procedure at the bottom of this page.

There’s also a Hak5 Turtle/QuickCreds demo and explanation video by Darren Kitchen and Shannon Morse thats well worth a view.

Capturing Creds

Insert the Turtle into the (locked) target PC and wait for the creds to be captured. Our Turtle’s amber Ethernet light followed this pattern on insertion:
– ON/OFF
– OFF (10 secs)
– Blinking at 1 Hz (15 secs)
– OFF (1-2 secs)
– Rapid Blinking > 1 Hz (indefinitely or until we launch PuTTY when it remains ON)

From testing, once we see the rapid blinking, the creds have been captured.

If you have an Internet cable plugged in to the Turtle when capturing creds, you can also remote SSH into the Turtle to retrieve the captured creds.This is not in the scope of this post however.

For our testing, we will keep it simple and use PuTTY’s scp to retrieve the stored creds (eg capture creds, retrieve Turtle, take Turtle back to base for creds retrieval):
We remove the Turtle from the target PC and re-insert it into our config PC. For our testing on a single laptop this meant – we removed the Turtle, unlocked the laptop and then re-inserted the Turtle.
Note: Due to the auto enable, the Turtle will also capture the config PC’s creds upon insertion.

Now PuTTY in to the Turtle, then choose Exit to get to the Turtle command prompt/shell (shell … Get it? hyuk, hyuk).

To find the latest saved creds we can type something like:

ls -alt /root/loot

which shows us the latest creds (corresponding to our current config PC) is stored under /root/loot/12/

root@turtle:~# ls -alt /root/loot/
-rw-r–r–    1 root     root           319 Jan  2 11:14 responder.log
drwxr-xr-x    2 root     root             0 Jan  2 11:13 12
drwxr-xr-x   14 root     root             0 Jan  2 11:11 .
drwxr-xr-x    2 root     root             0 Jan  2 11:01 11
drwxr-xr-x    2 root     root             0 Jan  2 11:00 10
drwxr-xr-x    2 root     root             0 Jan  2 10:46 9
drwxr-xr-x    2 root     root             0 Jan  2 08:58 8
drwxr-xr-x    2 root     root             0 Jan  2 08:49 7
drwxr-xr-x    2 root     root             0 Jan  2 08:46 6
drwxr-xr-x    2 root     root             0 Jan  2 08:35 5
drwxr-xr-x    2 root     root             0 Jan  2 08:34 4
drwxr-xr-x    2 root     root             0 Jan  2 08:26 3
drwxr-xr-x    2 root     root             0 Jan  2 08:21 2
drwxr-xr-x    2 root     root             0 Jan  2 08:20 1
drwxr-xr-x    1 root     root             0 Jan  2 08:20 ..
root@turtle:~#

So looking further at /root/loot/11/ (ie the creds from when we plugged the Turtle into the locked laptop) shows us a few log files and a text file containing our captured creds (ie HTTP-NTLMv2-172.16.84.182.txt).

root@turtle:~# ls /root/loot/11/
Analyzer-Session.log           Poisoners-Session.log
Config-Responder.log           Responder-Session.log
HTTP-NTLMv2-172.16.84.182.txt
root@turtle:~#

Our creds should be stored in HTTP-NTLMv2-172.16.84.182.txt and we can use the following command to check that the file contents look OK:

more /root/loot/HTTP-NTLMv2-172.16.84.182.txt

which should return something like:

admin::N46iSNekpT:08ca45b7d7ea58ee:88dcbe4446168966a153a0064958dac6:5c7830315c7830310000000000000b45c67103d07d7b95acd12ffa11230e0000000052920b85f78d013c31cdb3b92f5d765c783030

Where admin is the login name and the second field (eg N46iSNekpT) corresponds to the domain.
Note: This is an NTLMv2 example sourced from hashcat.

Once we have found the appropriate file containing the creds we want, we can use PuTTY pscp.exe to copy the files from the Turtle to our config PC.
From our Windows config PC we can use something like:

pscp root@172.16.84.1:/root/loot/11/HTTP-NTLMv2-172.16.84.182.txt .

to copy out the creds file. Note the final . to copy the creds file into the current directory on the config PC.

We can then feed this (file or individual entries) into hashcat to crack the user password. This is an exercise left for the reader.

Turtle Artifacts?

Now that we have our creds, lets see if we can find any fresh Turtle scat er, artifacts.

Starting with the Turtle plugged in to an unlocked PC, we look under the Windows Device Manager and find the Network adapter driver for the Turtle – ie the “Realtek USB FE Family Controller

Turtle Network Adapter Driver Properties

The Details Tab from the Properties screen yields a “Device Instance Path” of:
USB\VID_0BDA&PID_8152\00E04C36150A

Similarly, the “Hardware Ids” listed were “USB\VID_0BDA&PID_8152” and “USB\VID_0BDA&PID_8152&REV_2000“.

The HardwareId string (“VID_0BDA&PID_8152“) implies that the driver was communicating with a Realtek 8152 USB Ethernet controller. Note: 0BDA is the vendor id for Realtek Semiconductor (see https://usb-ids.gowdy.us/read/UD/0bda) and the Turtle Wiki specs confirm the Turtle uses a “USB Ethernet Port – Realtek RTL8152”.

We then used FTK Imager (v3.4.2.2) to grab the Registry hives so we can check them for artifacts.

Searching the SYSTEM hive for part of the “Device Instance Path” string (ie “VID_0BDA&PID_8152“) yields an entry in SYSTEM\ControlSet001\Enum\USB\VID_0BDA&PID_8152
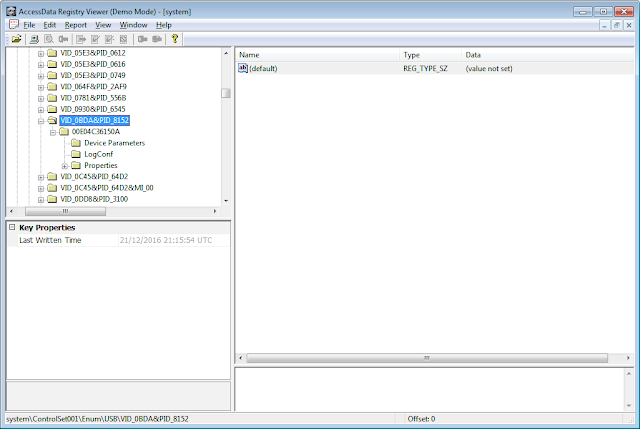
Potential First Turtle Insertion Time

The Last Written Time appears to match the first time the Turtle was inserted into the PC (21DEC2016 @ 21:15:54 UTC).

Another hit occurs in SYSTEM\ControlSet001\Enum\USB\VID_0BDA&PID_8152\00E04C36150A

Potential Most Recent Turtle Insertion Time

The Last Written Time appears to match the most recent time the Turtle was inserted (2JAN2017 @ 11:45:01 UTC).

The Turtle’s 172.16.84.1 address appears in the Windows SYSTEM Registry hive as a “DhcpServer” value under SYSTEM\ControlSet001\services\Tcpip\Parameters\Interfaces\{59C1F0C4-66A7-42C8-B25E-6007F3C40925}.
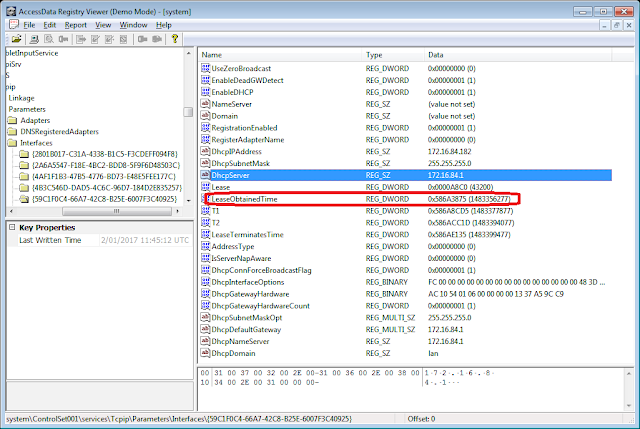
Turtle’s DHCP Address and Timestamp

Additionally under that same key, we can see a “LeaseObtainedTime” value which appears to be in seconds since Unix epoch (1JAN1970).
Using DCode to translate gives us:

Turtle DHCP LeaseObtainedTime Conversion

ie 2 JAN 2017 @ 11:24:37
This time occurs between the first time the Turtle was inserted (21DEC2016) and the most recent time the Turtle was inserted (2JAN2017 @ 11:45:01). This is plausible as the Turtle was plugged in multiple times during testing on the 2 JAN 2017. It is estimated that the Turtle was first plugged in on 2 JAN 2017 around the same time as the “LeaseObtainedTime”. 

These timestamps potentially enable us to give a timeframe for Turtle use. We say potentially because it is possible that another device using the “Realtek USB FE Family Controller” driver may have also been used. However, the specific IP address (172.16.84.1) can help us point the flipper at a rogue Turtle.

The “Realtek USB FE Family Controller” string also appears in the “Description” value under the SOFTWARE hive:
SOFTWARE\Microsoft\Windows NT\CurrentVersion\NetworkCards\17

NetworkCards entry potentially pointing to Turtle

Note: The NetworkCards number entry will vary (probably will not be 17 in all cases)

There are probably more artifacts to be found but these Registry entries were the ones that were the most obvious to find. The Windows Event logs did not seem to log anything Turtle-y definitive.

However, based on the artifacts above, we can only say that a Turtle was probably plugged in. We don’t have enough (yet?) to state which modules (if any) were run.

Final Thoughts

Anecdotally from the Hak5 Turtle Forums, capturing Windows credentials with the LAN Turtle seems to be hit and miss.
From our testing, the Turtle QuickCreds module worked for a Win7 laptop but failed to capture creds for a Win10 VM running on the same laptop. Once the Turtle was plugged in to the laptop, it captured the creds for the host Win7 OS but upon connecting the Turtle to the Win10 VM via the “Removable Devices” VMware 12 Player menu, the amber LED remains solidly lit and the Win10 creds were not captured.
Interestingly, not all of the Win7 Registry artifacts listed previously were observed in the Win10 VM’s Registry:
Both SYSTEM\ControlSet001\Enum\USB\VID_0BDA&PID_8152 and SYSTEM\ControlSet001\Enum\USB\VID_0BDA&PID_8152\00E04C36150A were present in the Win10 SYSTEM registry.
However, no hits were observed for “172.16.84.1” in SYSTEM.
There were various hits for “Realtek USB FE Family Controller” in SYSTEM.
The “Realtek USB FE Family Controller” string also appears in the “Description” value under the Win10 SOFTWARE hive:
SOFTWARE\Microsoft\Windows NT\CurrentVersion\NetworkCards\5
The lack of Win10 Registry DHCP artifacts probably indicates that while the Realtek USB Ethernet driver was installed, the Turtle was unable to assign the 172.16.84.1 IP address within the WIN10 VM (possibly because the Win7 still has it reserved?).

Fortunately, Jackk has recorded a helpful YouTube video demonstrating the LAN Turtle running QuickCreds successfully against a Win10 laptop (not VM). So it is possible on Win10 … Jackk also shows how to use the Turtle’s sshfs module to copy off the cred files via a FileZilla client (instead of using pscp).

Any comments/suggestions are turtle-y welcome in the comments section below.

Continue reading Monkey Plays (LAN) Turtle

Monkey Plays (LAN) Turtle

OMG! Sooo Turtle-y!

The Hak5 LAN Turtle recently plodded across our desk so we decided to poke it with a stick and see how effective it is in capturing Windows (7) credentials.
From the LAN Turtle wiki:

The LAN Turtle is a covert Systems Administration and Penetration Testing tool providing stealth remote access, network intelligence gathering, and man-in-the-middle monitoring capabilities.
Housed within a generic “USB Ethernet Adapter” case, the LAN Turtle’s covert appearance allows it to blend into many IT environments.

It costs about U$50 and looks like this:

It consists of a System-On-Chip running an openwrt (Linux) based OS. Amongst other things, it can act like a network bridge/router between:
– a USB Ethernet interface which you plug into your target PC. This interface can also be ssh’d into via its static IP address 172.16.84.1 (for initial configuration and copying off creds).
– a 10/100 Mbps Ethernet port which you can use to connect the Turtle to the Internet (providing remote shell access and allowing the install of modules/updates from LANTurtle.com). It is not required to capture creds during normal operation.

It also has 16 MB on board Flash memory and can be configured to run a bunch of different modules via a Module Manager.

By using the Turtle’s USB Ethernet interface to create a new network connection and then sending the appropriate responses, the Turtle is able to capture a logged in user’s Windows credentials. Apparently Windows will send credentials over a network whether the screen is locked or not (a user must be logged in).

We will be using the QuickCreds module written by Darren Kitchen which was based on the research of Rob “Mubix” Fuller.
To send the appropriate network responses, QuickCreds calls Laurent Gaffie’s Responder Python script and saves credentials (eg NTLMv2 for our Win 7 test case) to numbered directories in /root/loot. The amber Ethernet LED will blink rapidly while QuickCreds is running. When finished capturing (~30 secs to a few minutes), the amber LED is supposed to remain lit.

But wait – there’s more! The turtle can also offer remote shell/netcat/meterpreter access, DNS spoofing, man-in-the-middle browser attacks, nmap scans and so much more via various downloadable modules. Alas, we only have enough time/sanity/Turtle food to look at the QuickCreds module.

Setup

We will be both configuring and testing the Turtle on a single laptop running Windows 7 Pro x64 with SP1. Realistically, you would configure it on one PC and then plug it into a separate target PC.
 
We begin setup by plugging the Turtle into the configuration PC and using PuTTY to ssh as root to 172.16.84.1. For proper menu display, be sure to adjust the PuTTY Configuration’s Windows, Translation, Remote character set to “Latin-1, Western Eur“.

The default root Turtle password is sh3llz. Upon first login, the user is then prompted to change the root password.
Ensure an Internet providing Ethernet cable is plugged in to the Turtle’s Ethernet port to provide access to LANTurtle.com updates.

Note: The Turtle may also require Windows to install the “Realtek USB FE Family Controller” Network Adapter driver before you can communicate with it.

Upon entering/confirming the new root password, you should see something like:

LAN Turtle Main Menu via PuTTY session

Under Modules, Module Manager, go to Configure, then Directory to select the QuickCreds module for download. You can select/check a module for download via the arrow/spacebar keys.

Return back to Modules, select the QuickCreds module, then Configure (this will take a few minutes to download/install/configure the dependencies from the Internet). Remember to have an Internet providing Ethernet cable plugged into the Turtle.

Select the QuickCreds Enable option so QuickCreds is launched whenever the Turtle is plugged into a USB port.
(Optional) You can also select the Start option to start the QuickCreds module now and it should collect your current Windows login creds.

We are now ready to remove the Turtle from our config PC and place it into a target PC’s USB port.

If you’re having issues getting the Turtle working, try to manually reset the Turtle following the “Manually Upgrading” wiki procedure at the bottom of this page.

There’s also a Hak5 Turtle/QuickCreds demo and explanation video by Darren Kitchen and Shannon Morse thats well worth a view.

Capturing Creds

Insert the Turtle into the (locked) target PC and wait for the creds to be captured. Our Turtle’s amber Ethernet light followed this pattern on insertion:
– ON/OFF
– OFF (10 secs)
– Blinking at 1 Hz (15 secs)
– OFF (1-2 secs)
– Rapid Blinking > 1 Hz (indefinitely or until we launch PuTTY when it remains ON)

From testing, once we see the rapid blinking, the creds have been captured.

If you have an Internet cable plugged in to the Turtle when capturing creds, you can also remote SSH into the Turtle to retrieve the captured creds.This is not in the scope of this post however.

For our testing, we will keep it simple and use PuTTY’s scp to retrieve the stored creds (eg capture creds, retrieve Turtle, take Turtle back to base for creds retrieval):
We remove the Turtle from the target PC and re-insert it into our config PC. For our testing on a single laptop this meant – we removed the Turtle, unlocked the laptop and then re-inserted the Turtle.
Note: Due to the auto enable, the Turtle will also capture the config PC’s creds upon insertion.

Now PuTTY in to the Turtle, then choose Exit to get to the Turtle command prompt/shell (shell … Get it? hyuk, hyuk).

To find the latest saved creds we can type something like:

ls -alt /root/loot

which shows us the latest creds (corresponding to our current config PC) is stored under /root/loot/12/

root@turtle:~# ls -alt /root/loot/
-rw-r–r–    1 root     root           319 Jan  2 11:14 responder.log
drwxr-xr-x    2 root     root             0 Jan  2 11:13 12
drwxr-xr-x   14 root     root             0 Jan  2 11:11 .
drwxr-xr-x    2 root     root             0 Jan  2 11:01 11
drwxr-xr-x    2 root     root             0 Jan  2 11:00 10
drwxr-xr-x    2 root     root             0 Jan  2 10:46 9
drwxr-xr-x    2 root     root             0 Jan  2 08:58 8
drwxr-xr-x    2 root     root             0 Jan  2 08:49 7
drwxr-xr-x    2 root     root             0 Jan  2 08:46 6
drwxr-xr-x    2 root     root             0 Jan  2 08:35 5
drwxr-xr-x    2 root     root             0 Jan  2 08:34 4
drwxr-xr-x    2 root     root             0 Jan  2 08:26 3
drwxr-xr-x    2 root     root             0 Jan  2 08:21 2
drwxr-xr-x    2 root     root             0 Jan  2 08:20 1
drwxr-xr-x    1 root     root             0 Jan  2 08:20 ..
root@turtle:~#

So looking further at /root/loot/11/ (ie the creds from when we plugged the Turtle into the locked laptop) shows us a few log files and a text file containing our captured creds (ie HTTP-NTLMv2-172.16.84.182.txt).

root@turtle:~# ls /root/loot/11/
Analyzer-Session.log           Poisoners-Session.log
Config-Responder.log           Responder-Session.log
HTTP-NTLMv2-172.16.84.182.txt
root@turtle:~#

Our creds should be stored in HTTP-NTLMv2-172.16.84.182.txt and we can use the following command to check that the file contents look OK:

more /root/loot/HTTP-NTLMv2-172.16.84.182.txt

which should return something like:

admin::N46iSNekpT:08ca45b7d7ea58ee:88dcbe4446168966a153a0064958dac6:5c7830315c7830310000000000000b45c67103d07d7b95acd12ffa11230e0000000052920b85f78d013c31cdb3b92f5d765c783030

Where admin is the login name and the second field (eg N46iSNekpT) corresponds to the domain.
Note: This is an NTLMv2 example sourced from hashcat.

Once we have found the appropriate file containing the creds we want, we can use PuTTY pscp.exe to copy the files from the Turtle to our config PC.
From our Windows config PC we can use something like:

pscp root@172.16.84.1:/root/loot/11/HTTP-NTLMv2-172.16.84.182.txt .

to copy out the creds file. Note the final . to copy the creds file into the current directory on the config PC.

We can then feed this (file or individual entries) into hashcat to crack the user password. This is an exercise left for the reader.

Turtle Artifacts?

Now that we have our creds, lets see if we can find any fresh Turtle scat er, artifacts.

Starting with the Turtle plugged in to an unlocked PC, we look under the Windows Device Manager and find the Network adapter driver for the Turtle – ie the “Realtek USB FE Family Controller

Turtle Network Adapter Driver Properties

The Details Tab from the Properties screen yields a “Device Instance Path” of:
USB\VID_0BDA&PID_8152\00E04C36150A

Similarly, the “Hardware Ids” listed were “USB\VID_0BDA&PID_8152” and “USB\VID_0BDA&PID_8152&REV_2000“.

The HardwareId string (“VID_0BDA&PID_8152“) implies that the driver was communicating with a Realtek 8152 USB Ethernet controller. Note: 0BDA is the vendor id for Realtek Semiconductor (see https://usb-ids.gowdy.us/read/UD/0bda) and the Turtle Wiki specs confirm the Turtle uses a “USB Ethernet Port – Realtek RTL8152”.

We then used FTK Imager (v3.4.2.2) to grab the Registry hives so we can check them for artifacts.

Searching the SYSTEM hive for part of the “Device Instance Path” string (ie “VID_0BDA&PID_8152“) yields an entry in SYSTEM\ControlSet001\Enum\USB\VID_0BDA&PID_8152

Potential First Turtle Insertion Time

The Last Written Time appears to match the first time the Turtle was inserted into the PC (21DEC2016 @ 21:15:54 UTC).

Another hit occurs in SYSTEM\ControlSet001\Enum\USB\VID_0BDA&PID_8152\00E04C36150A

Potential Most Recent Turtle Insertion Time

The Last Written Time appears to match the most recent time the Turtle was inserted (2JAN2017 @ 11:45:01 UTC).

The Turtle’s 172.16.84.1 address appears in the Windows SYSTEM Registry hive as a “DhcpServer” value under SYSTEM\ControlSet001\services\Tcpip\Parameters\Interfaces\{59C1F0C4-66A7-42C8-B25E-6007F3C40925}.

Turtle’s DHCP Address and Timestamp

Additionally under that same key, we can see a “LeaseObtainedTime” value which appears to be in seconds since Unix epoch (1JAN1970).
Using DCode to translate gives us:

Turtle DHCP LeaseObtainedTime Conversion

ie 2 JAN 2017 @ 11:24:37
This time occurs between the first time the Turtle was inserted (21DEC2016) and the most recent time the Turtle was inserted (2JAN2017 @ 11:45:01). This is plausible as the Turtle was plugged in multiple times during testing on the 2 JAN 2017. It is estimated that the Turtle was first plugged in on 2 JAN 2017 around the same time as the “LeaseObtainedTime”. 

These timestamps potentially enable us to give a timeframe for Turtle use. We say potentially because it is possible that another device using the “Realtek USB FE Family Controller” driver may have also been used. However, the specific IP address (172.16.84.1) can help us point the flipper at a rogue Turtle.

The “Realtek USB FE Family Controller” string also appears in the “Description” value under the SOFTWARE hive:
SOFTWARE\Microsoft\Windows NT\CurrentVersion\NetworkCards\17

NetworkCards entry potentially pointing to Turtle

Note: The NetworkCards number entry will vary (probably will not be 17 in all cases)

There are probably more artifacts to be found but these Registry entries were the ones that were the most obvious to find. The Windows Event logs did not seem to log anything Turtle-y definitive.

However, based on the artifacts above, we can only say that a Turtle was probably plugged in. We don’t have enough (yet?) to state which modules (if any) were run.

Final Thoughts

Anecdotally from the Hak5 Turtle Forums, capturing Windows credentials with the LAN Turtle seems to be hit and miss.
From our testing, the Turtle QuickCreds module worked for a Win7 laptop but failed to capture creds for a Win10 VM running on the same laptop. Once the Turtle was plugged in to the laptop, it captured the creds for the host Win7 OS but upon connecting the Turtle to the Win10 VM via the “Removable Devices” VMware 12 Player menu, the amber LED remains solidly lit and the Win10 creds were not captured.
Interestingly, not all of the Win7 Registry artifacts listed previously were observed in the Win10 VM’s Registry:
Both SYSTEM\ControlSet001\Enum\USB\VID_0BDA&PID_8152 and SYSTEM\ControlSet001\Enum\USB\VID_0BDA&PID_8152\00E04C36150A were present in the Win10 SYSTEM registry.
However, no hits were observed for “172.16.84.1” in SYSTEM.
There were various hits for “Realtek USB FE Family Controller” in SYSTEM.
The “Realtek USB FE Family Controller” string also appears in the “Description” value under the Win10 SOFTWARE hive:
SOFTWARE\Microsoft\Windows NT\CurrentVersion\NetworkCards\5
The lack of Win10 Registry DHCP artifacts probably indicates that while the Realtek USB Ethernet driver was installed, the Turtle was unable to assign the 172.16.84.1 IP address within the WIN10 VM (possibly because the Win7 still has it reserved?).

Fortunately, Jackk has recorded a helpful YouTube video demonstrating the LAN Turtle running QuickCreds successfully against a Win10 laptop (not VM). So it is possible on Win10 … Jackk also shows how to use the Turtle’s sshfs module to copy off the cred files via a FileZilla client (instead of using pscp).

Any comments/suggestions are turtle-y welcome in the comments section below.

Continue reading Monkey Plays (LAN) Turtle

Bearded – Security Automation Platform

Bearded is an open source Security Automation platform. The platform allows Development, QA, and Security team members to perform automated web security scans with a set of tools, and re-execute those scans as needed. All tools can be executed in the c… Continue reading Bearded – Security Automation Platform

Cyborg Hawk Linux – Penetration Testing Linux Distro

Cyborg Hawk Linux is a Ubuntu (Linux) based Penetration Testing Linux Distro developed and designed for ethical hackers and penetration testers. Cyborg Hawk Distro can be used for network security and assessment and also for digital forensics. It also has various tools suited to the testing of Mobile Security and Wireless infrastructure. It’s…

Read the full post at darknet.org.uk

Continue reading Cyborg Hawk Linux – Penetration Testing Linux Distro